A Guide to Custom Wood Flooring
This page is for anyone considering a custom wood floor. We have crafted hardwood medallions, parquet, borders, and marquetry inlays from our Pennsylvania workshop for thirty years, and the guide below walks through what to expect: the vocabulary you'll hear, how a project moves from a sketch to a delivered piece, what drives cost, and the practical decisions worth thinking about before you commit.
A Brief History
Ornamental wood flooring comes out of a European tradition. The French chateaus, Russian palaces, and Italian villas of the seventeenth and eighteenth centuries were where marquetry and parquetry first appeared at scale. Art Deco and Art Nouveau later carried the form into modern architecture, both public and private. Today designers and homeowners commission the work again, in houses where the detail matters.

Wood floor inlay at the Hermitage Palace, mid-1700s.
How We Build a Custom Floor
Every inlay piece is milled with a precision CNC router. CNC matters because the alternative, laser cutting, leaves a charred edge that prevents the seams from gluing properly. Routed pieces fit tightly, glue cleanly, and refinish like a single floor.
We do not paint or stain a surface to create an image. Every color in our designs is the natural color of the wood. Years from now, when the floor is sanded and refinished, the design will still be there. Inlays leave our workshop pre-assembled and ready for glue-down by a qualified flooring contractor (you supply the installer; we supply the floor).
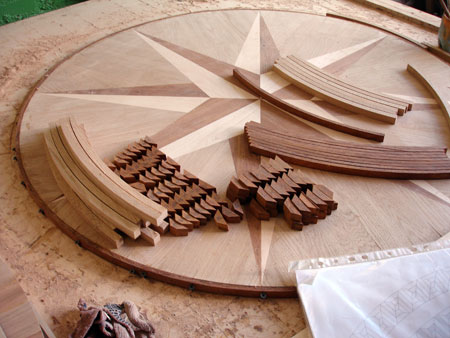
Every piece of a wood medallion is cut and hand-assembled before it leaves the shop.
The Pieces of a Decorative Floor
Most decorative floors are built from the same handful of parts. These terms come up in every drawing and quote we send, so they are worth knowing before the conversation starts.
- Apron. The plank flooring outside the border, also called the frame or skirting. The apron sits between the wall and the border, typically about twelve inches wide, so the border stays visible and apron widths can be equalized on all four sides. Plank can run parallel or perpendicular to the walls. See our plank and herringbone options.
- Border. A flooring pattern that frames a room, defines a transition between spaces, or follows the perimeter of a fireplace hearth or dining table. Borders are produced in roughly three-foot solid sections with repeating patterns. Browse our border selection.
- Corner Block. A border element that interrupts the pattern at a turn, usually a square piece at a ninety-degree intersection. We produce custom corner blocks at other angles, and some border designs mitre cleanly without one.
- Field. The main area of floor inside the border. The field can be plank, herringbone, or parquet. Plank and herringbone can be installed on the diagonal to add visual dimension. Parquet tiles are pre-assembled and ready for glue-down. See our parquet selection.
- Medallion / Inlay. A pattern installed at a focal point of the floor, usually centered in the room, in round, oval, square, or custom shape. Standard sizes run from thirty to forty-eight inches. We have produced single-piece inlays up to seventy-two inches, and one commissioned installation reached forty-five feet in diameter, the largest of its kind. We can match the thickness and finish of any medallion to the surrounding floor. To choose a size, take the shorter dimension of the room. With a border, the medallion usually sits at about one-third of that distance; without a border, one-third to one-half. Narrow, elongated rooms tend to look better with an oval. See our medallion selection.
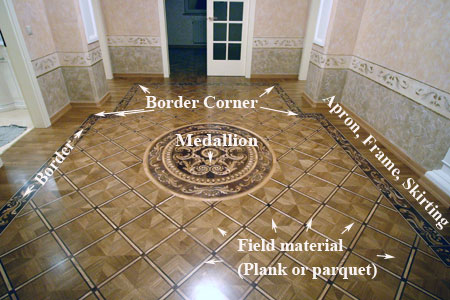
The pieces of a decorative floor: apron, border, corner block, field, and medallion.
Solid or Engineered?
One of the first practical decisions is construction type, because it affects price, where the floor can go, and how many times it can be refinished.
- Solid hardwood is one piece of wood from top to bottom, typically 3/4 inch thick. It can be sanded and refinished several times over its life. Plainsawn or quartersawn solid hardwood is the right choice for most installations, and quartersawn solid is dimensionally stable enough to install over radiant heat.
- Engineered hardwood is a top layer (the wear layer) of real hardwood, bonded to a plywood or HDF base beneath. The wear layer is what you see and sand. Engineered construction handles wider humidity swings and is the better choice for below-grade rooms (basements) and concrete slab installations. We match engineered medallions to engineered fields so thicknesses align.
Stock or Custom?
Ready-made designs are exactly that. You see what you order, the piece coordinates easily with the rest of the floor, and it ships quickly from inventory. When the timeline is tight or the design needs to align with a fixed palette, stock is the expedient choice.
Custom design is for clients who want a piece that belongs only to their floor. The process is collaborative. We work from photographs, sketches, or a written description, then refine through preliminary drawings and material selection before milling begins. Lead times for a custom medallion typically run four to seven weeks once a design is approved, depending on size and complexity.
Whichever direction you go, our Floor Designer is a useful first stop. The app lets you lay out a room, place borders and medallions, swap wood species, and see how patterns resolve at the edges. The hours you spend planning in the app save hours we would otherwise spend on initial design drafts, which keeps the project cost down. By the time you talk to our team, you can show us a working layout rather than start from a blank page.
Our gallery is a useful place to start. Architects and designers may also want to look at our architectural drawings from previous commissions.
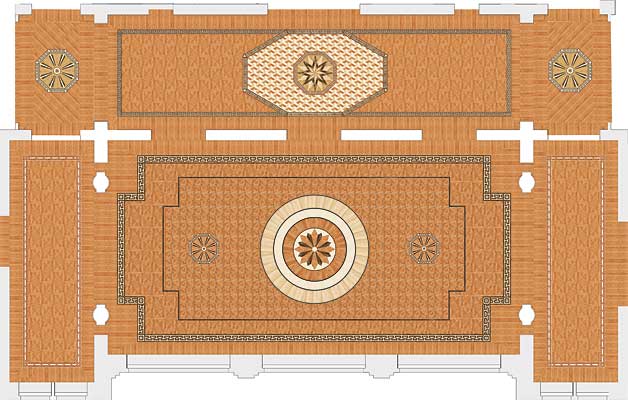
A color rendering of the floor plan helps to visualize the design before milling begins.
Most of the back-and-forth happens by email: images, sketches, references. Once the general parameters and budget are set, we produce preliminary sketches, refine through a round or two of revisions, and finalize a working drawing. Physical wood samples are available on request so colors and grain can be evaluated in the actual room light. More on the custom design process.
What Drives Cost
A custom project's budget comes down to five things:
- Size, with some economies of scale on larger projects.
- Complexity of the design. The detail of imagery, the scale of elements, and the number of wood species all add hours in the shop.
- Materials. Domestic species are the baseline; exotic woods, marble accents, and semi-precious stone raise the figure.
- Delivery and installation requirements (curbside vs. inside delivery, for example).
- Schedule. Expediting a piece moves it ahead of other work and costs more.
We typically compute direct material and labor time for one figure, then sanity-check against a price-per-square-foot benchmark from comparable past projects.
Choosing a Style
Knowing the overall interior style narrows the design choices quickly. Rustic, contemporary, traditional, transitional — each style eliminates several directions on character alone. From there, the field pattern, border, and any medallion can be picked to fit the room.
Natural wood colors usually work better than stained finishes. When the floor is eventually sanded and refinished, a design built from natural species stays coherent. Stained designs can shift, and they complicate any future refinish. Browse our wood species selection.
Borders and fields should complement each other, not compete. A busy border calls for a quieter field, and a simple border can support a more elaborate field. Field dimensions matter too: plan the layout so the pattern resolves with full or half repeats at the edges. Partial pieces against the apron read poorly.
Lumber, Cuts & Site Conditions
- Cutting Allowance. When ordering material, allow extra for the installer's cuts. Standard waste is about ten percent. Diagonal parquet or oddly shaped rooms warrant about fifteen percent. Our floor calculator can help estimate quantities.
- Plainsawn. Lumber in which the annual growth rings meet the board's surface at less than forty-five degrees. This exposes springwood and summerwood, producing a pronounced cathedral grain pattern. The most common cut in domestic hardwood.
- Quartersawn. Lumber in which the growth rings meet the surface at forty-five to ninety degrees. The medullary rays in ring-porous species (like white oak) show as distinctive flecks. More dimensionally stable than plainsawn, and we recommend it for radiant-heated floors. Typically more expensive.
- Fillets. The small pieces used to build fingerblock parquet. Also called fingers or slats.
- Acclimation. Hardwood absorbs and releases moisture as humidity changes. Before installation, the wood needs to sit at the install site for several days so it equalizes with the room. Skipping this step is the most common cause of cupping or gapping after install. We recommend at least five days for solid hardwood in stable conditions, longer if the site humidity is far from the workshop's. Engineered hardwood is more forgiving but still benefits from a few days on site.
A custom wood floor is a piece of architecture. It sits underfoot for decades, gets refinished a few times over its life, and rewards the planning that goes into it. When you are ready to talk through a project, reach us directly.
